• Cooking,  Health

    Ayurvedic Health Potion – My Morning Routine

    When I wake up in the morning, at 5:00 am (I know it sounds early, but I decided not to adapt completely to Swedish time after coming back from India), I start by making my health potion. I start by boiling up water and while it’s getting to the right temperature I start adding all the different herbs and spices into my large 50 cl cup. I believe it’s important to have a large cup for this health potion, because otherwise it becomes too strong and not as easy to drink. I heat it up again after I’ve drank half the cup, because I’m a very slow drinker.

    The ingredients that I use are:

    • 1 tsp of organic matcha tea from Japan
    • 1/3 tsp of ashwagandha (ayurvedic herb)
    • 1 dash of tulsi powder (holy Indian basil)
    • 1/4 tsp of organic ginger powder
    • 1/3 tsp of cinnamon
    • 1 dash of organic turmeric
    • optional: raw unprocessed sugar to taste (I try not to add any sugar, but in the beginning it might help with the taste)
    • boiling water
    • oat milk or any other vegetable milk substitute of your choice

    I add all the dry ingredients in my cup and start pouring a little boiling water at a time to mix all the herbs together. I fill up slightly more than half the cup with boiling water and add oat milk to fill it up, that is also depending on taste and preference.

    I feel energised and very refreshed by drinking this health potion. My hormones are getting back into a nice balance, I can really feel my body changing for the better with these simple steps towards a more healthy lifestyle.

    green tea

    After drinking the tea, I go on with doing my yoga exercise routine, mostly just for 15-30 min, but I intend to increase it gradually.

    Hope this is helpful to anyone out there, and let me know if you have any questions and I will get back to you.

    Peace and Love,
    Kimmi Madeline

  • Chana Daal - Lentil Soup
    Cooking

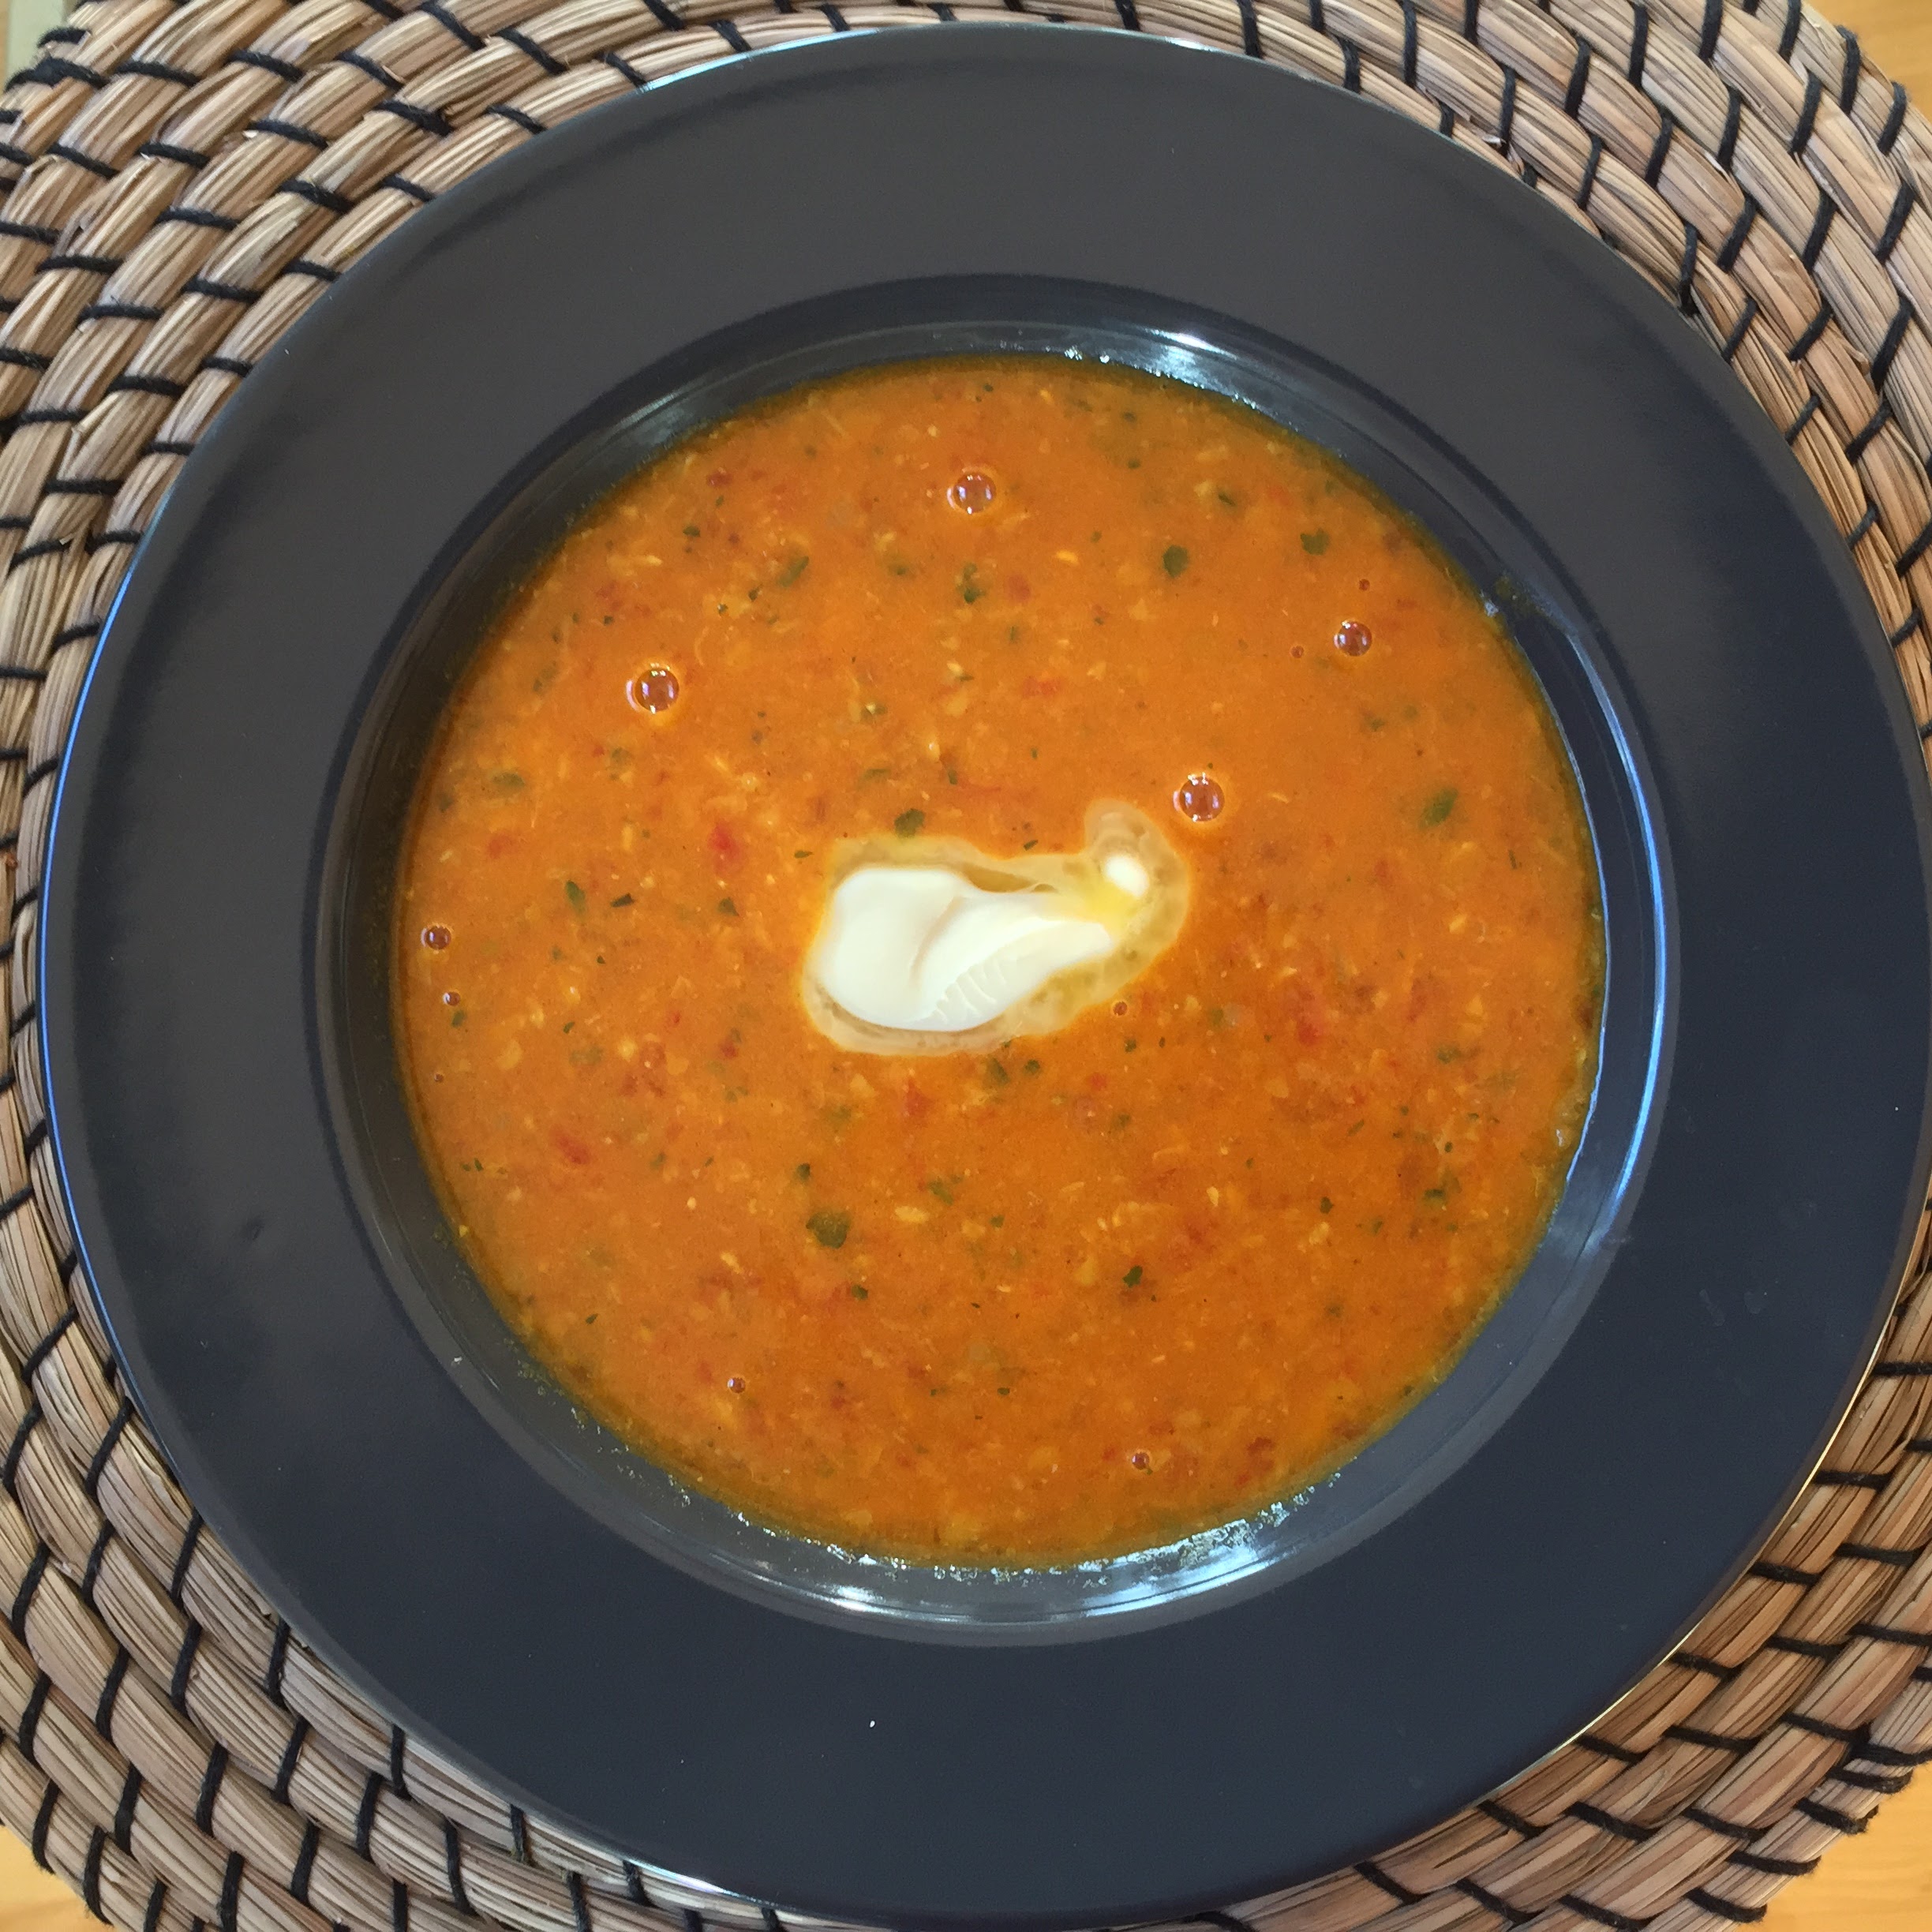
    Chana Dal | Vegetarian Indian Soup | Recipe

    Chana Dal 

    RECIPE

    Ingredients

    2-3 Small Onions
    6-7 Garlic Cloves
    2 cm / 1 inch of Ginger
    3 ½ – 4dl of dry Chana Dal
    1 Package of Crushed Tomatoes (390g)
    1 tbsp Tomato Paste
    1 can of Coconut Milk
    1 Organic Vegetable Stock (equivalent of 0.5l liquid stock)
    2 tbsp Olive Oil
    1 tsp Turmeric
    1 tsp jeera
    1 tbsp Coriander Powder
    Chili powder (as much as you’d prefer)
    ½ tsp hing or asafoetida powder
    1 tsp fenugreek seeds
    salt to taste

    HOW TO

    These are all the ingredients for the chana dal. Start off by putting the dry chana dal in water to soak for 1 to 1½ hour.

    Ingredients for Chana daal

    Ingredients for Chana Daal

    Extra virgin Olive Oil
    Extra virgin Olive Oil

    Meanwhile the chana dal are soaking in water, I chop up the onions, garlic and ginger together in a mixer.
    I use this method because I find it easier and quicker, but you can of course chop them up by hand and also add them one by one in the frying pan.


    Onion, Garlic and Ginger
    Onion, Garlic and Ginger


    After the chana dal have soaked in water I bring 2 litres of water to a boil with 1 tsp of turmeric,
    1 piece of vegetable stock and salt, in which I add the lentils to boil for around 35-40 minutes on medium heat.
    While the lentils are boiling we’re going to create the masala which will later go into the boiling lentils.


    Boiling Chana lentils


    To make the masala, you start by adding your choice of vegetable oil (I use olive oil). When the oil is warm enough
    you can pour in the jeera seeds so they start splutter.


    Olive oil and jeera


    Then you add the onion mixture to the oil and fry it on medium heat for about 5 minutes before adding spices.


    Chopped onion, garlic and ginger mix


    The spices we add are visible in the image below. I use this Indian tray of spices to store my spices,
    and it’s a very convenient way to keep them fresh and to only fill them up when they’re finished.
    If you’re interested in buying a similar, I’ve found great ones over at Ebay.


    Indian spice mix


    So we’ll add the coriander powder, turmeric, chili and jeera powder. Mix it together with the onion mixture
    and let it fry for another two-three minutes.


    Chopped onions


    Afterwards, you’ll add the hing powder. This is optional, if you don’t have hing at home, you can skip this step.


    Chopped onions


    Continue with adding the tomato paste to the masala mixture, and blend well.


    Chopped onions with tomato puré


    Also, we have added the crushed tomatoes to the masala and we’ll let it cook for another 5 minutes before
    it’s ready to be poured into the chana dal.


    Chopped onions with tomatoes


    When the 35-40 minutes of boiling the chana dal have passed and the lentils feel a bit more soft, you can go ahead
    and add the masala to the boiling chana dal. Keep the heat at medium-low and let it simmer so that it blends well.


    Chana dal with masala mix


    In addition, we add the kasori methi, also called as fenugreek seeds in English. If you don’t have this at home,
    you may skip this step.


    Fenugreek seeds in chana dal


    Optional: I added a piece of butter to my chana dal at this stage. If you want to keep it vegan, you don’t have
    to add the butter.


    Butter in chana dal


    To make the chana Dal a bit more creamier, I add one can of coconut milk and you can see the colour change
    to a more creamy yellow (image below).


    Coconut milk in chana dal


    The final step is to add some freshly chopped coriander/cilantro and turn off the heat.


    Coriander in Chana dal


    Voilá! Here we have the final result (below). I like to serve it with a small click of butter in my bowl and
    eat a nice home baked bread or chapati/roti to go with the dal.


    Home cooked Chana Dal

    Chana Dal with freshly baked bread


    Hope you enjoy this recipe and let me know if you’ve tried it out yourself. If you have any of your own suggestions,
    please leave them in the comments so others can benefit from your tips and tricks. Check out my Youtube channel to see more recipes in the future and be sure to hit the subscribe button if you want to stay in touch.
    I post images of all kinds of food related things on my Instagram, either out in restaurants or homemade food – be sure to check it out if you’re interested in giving me a follow.

    Peace and Love,
    Kimmi Madeline

    About me

  • Cooking,  Photography

    India Trip 2016: Food Pictures

    I have gathered some pictures of different types of food we had in India throughout our trip. Everything, everywhere we went, was absolutely amazing and delicious. I don’t think I ate anything not worth it ever during the whole trip. Of course I have loads of more pictures of food, but I didn’t want it to take over the whole post so here’s a bunch of my favourites. Hope you enjoy and that you’ll be interested in making a food trip to India sometime soon!

    Peace and Love,
    signature


  • Cooking,  Health

    Sugar isn’t the Answer

    I’m currently trying my hardest to sugar-fast in my diet. I didn’t eat all that much sugar before but it’s still good to be aware of what we’re putting into our bodies. I’ve never really liked candy and those kinds of sugar sources, but I love a piece of chocolate every now and then. Or a delicious piece of cake!
    I had to read up on what the daily recommendation of sugar really is and it’s shocking to know that you easily get that amount by the products we eat daily. These days it seems like all kinds of food products contain added sugar, to the extent that it’s not healthy for us. Bread, yogurt, light-products, granola and much more are not sugar-free anymore, unless you really look out and read on the labels.
    Most people I speak to about this would react in a way that if you’re not unhealthy and overweight, I shouldn’t have to worry about my sugar intake. I don’t agree. We all have a responsibility towards ourselves and our body to eat the best we can and to not put junk into our bodies. We want to grow old in grace and in a healthy manner, without any unnecessary sickness due to something we could have changed in our diet earlier in our lives.

    The recommended daily intake of sugar shouldn’t be more than 30 g for adults, and that is around 5-7 tsp of added sugar in all kinds of ways. Real fruit is not counted in that amount, since it contains fibers and it’s more filling because sugar (fructose) isn’t the sole ingredient.
    If you’re ever unsure of what is considered to be high sugar amount in products when reading on labels, you can go by these measures:

    • more than 22.5g of total sugars per 100g is high sugar amount
    • 5g of total sugars or less per 100g is low sugar amount

    To start the journey of cutting down on sugar is to identify what products in your cupboard are actually high or medium in sugar percentage, and replace them with healthier options. Also identify the products you normally buy where the sugar is hidden and are marketed as healthy but in reality contains  a lot of sugar. You will be surprised of how many products are looking healthy but they’re not.
    In the beginning it will be difficult, it is very hard to cut down on sugar, but you need to do it gradually. Replace one thing at a time. Try to eat as natural and sugar-free breakfast as possible, to not feel so tired and lethargic in the middle of the day when the blood sugar gets low.

     Let’s start the journey towards a more sugar free diet. 

    Peace and Love,
    signature


  • Cooking,  Vlog/YouTube

    Allergy-Friendly Gluten-Free Vegan American Pancakes


    I made one of my favourite recipes a while back and decided to film it so I can show you how I actually make them. I made vegan, gluten-free American pancakes. I have made egg-free pancakes many many times before, but I wanted to try to recreate another version that are thicker like American ones. If you’re interested in making these here is the recipe and follow the instructions in the video below.

    2½ cups Gluten Free Flour
    2 tbsp Baking Powder
    1 tsp of No Egg Mix
    1 tbsp of vanilla powder
    1/4 cup desiccated coconut
    4 tbsp vegetable oil
    2 cups of oat/soy/coconut/almond milk
    Pinch of salt

    Peace & Love,
    signature

  • Cooking,  Health,  Personal,  Vlog/YouTube

    Allergies and Diet Choices (YouTube)

    One of the biggest topics of my life has been allergies and dealing with them in the best way. All the way from checking the ingredients list on all food packages to learning how to cook allergy friendly. During my whole childhood, throughout my teenage years and now into my adult life, I’m finally starting to come to terms with my allergies and learning to cope with them. I want to share my experience with you all and bring you my best tips and recipes of allergy friendly food.
    I made a first video in a series of many more to come, that only touches the subject on the surface, to give you a gimpse of what I will be creating in the coming months.

    Excuse the bouncy video, it was made with my selfie stick and smartphone due to main camera not working.

    Hope you enjoy this video, and if you have any suggestions, comments or questions, please leave them in the comments here or over at YouTube. You can always find me on Facebook, Instagram and on YouTube. 🙂 Hope to talk to you there!

    Peace and Love,
    signature

  • Cooking,  Health,  Personal,  Thoughts

    Allergic to everything

    I’ve never really written about something that consumes all my daily life, and it has for the past 20 years. I’m 25 and I’ve always had allergies for as long as I can remember. I’ve always cheated with what I can allow myself to eat because I thought I could get away with it, by telling myself – it’s not that bad, the reactions could be worse. The result of that has always been endless nights of constant itching attacks and not being able to hinder myself even in public, and it just gets worse if I eat more of the food I’m allergic to. The scratching turns into the skin bleeding and then it becomes rashes and it’s out of control already…

    Recent months I’ve become more interested in becoming more fit and training at the gym properly to gain muscles and weight. To be able to accomplish that I needed to exceed my intake of protein, which had never earlier crossed my mind. I actually ate way too little protein before so I needed to take extra by drinking some protein shakes after the exercises. Then I realised that the most popular protein shake is usually made out of milk protein, which is also one of those ingredients I’ve been neglecting that the doctors told me that I’m allergic to (or at least according to the tests)

    These realisations made me more aware of what I put into my body so I decided to make a clean start when I moved to Stockholm. I contacted the doctor to start a new investigation so they’re able to take new allergy tests. I’ve started the process but I’m far from getting the tests done or getting the results of those. But what counts is that I’ve taken the steps that are necessary to understand my body a bit more.
    This realisation also made me more determined to avoid everything that came up in the tests back in 2007. I started writing a list,  a list that was long overdue, a list I’ve been avoiding to make for the longest time, because I thought I could cheat and still feel okay. It’s not okay, it’s my body and I want to feel good and be healthy. If that means I need to cut down on some of the good stuff, then I need to find other good stuff. I love cooking food, especially with all ingredients I’m allergic to. I can still do that, but to feed others. When it comes to me, things have got to change.

    I’m happy to hear some of your stories if you have anything similar to share. Do you have many allergies and how do you cope in your daily life? Please share your story with me in the comments below.

    Peace and Love,
    Kimmi